Large File Service: Securely Uploading Large Files To S3

FINRA routinely requests information from member brokerage firms. Firms, for example, upload individual attachments using a browser based application. As the firm’s data increases over time, so do their attachments.
However, this comes with challenges such as browser restrictions, machine speed, network speed, and server storage capacity. Previously, uploads had been streamed from the user’s machine to a FINRA server and ultimately stored on premise. By moving to a cloud centric technical architecture, we’ve been able to provide a secure approach to upload large files.
Note: Some configuration and coding examples are informational but are not meant to be complete. Consider your own requirements when designing an architectural solution.
LFS Architecture Components
In 2014, FINRA began using AWS instead of on premise resources. As part of this shift, we built a new and more robust large file service (LFS) that leverages cloud resources. AWS technologies used include Elastic Compute Cloud (EC2), Simple Storage Service (S3), Identity and Access Management (IAM), Security Token Service (STS), Key Management Service (KMS), and Simple Queue Service (SQS).
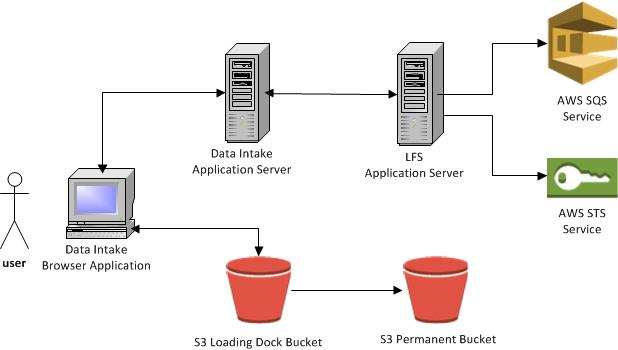
LFS is part of a Java web application running on an EC2 instance and exposes REST API’s to clients such as the Data Intake application. It uses STS to create temporary IAM credentials for writing files to an S3 loading dock bucket. It also uses SQS to receive S3 notifications and send messages back to client applications.
Below is a diagram showing the high level components for LFS.
LFS Sequence Flow
User Uploads File to S3 Loading Dock Bucket
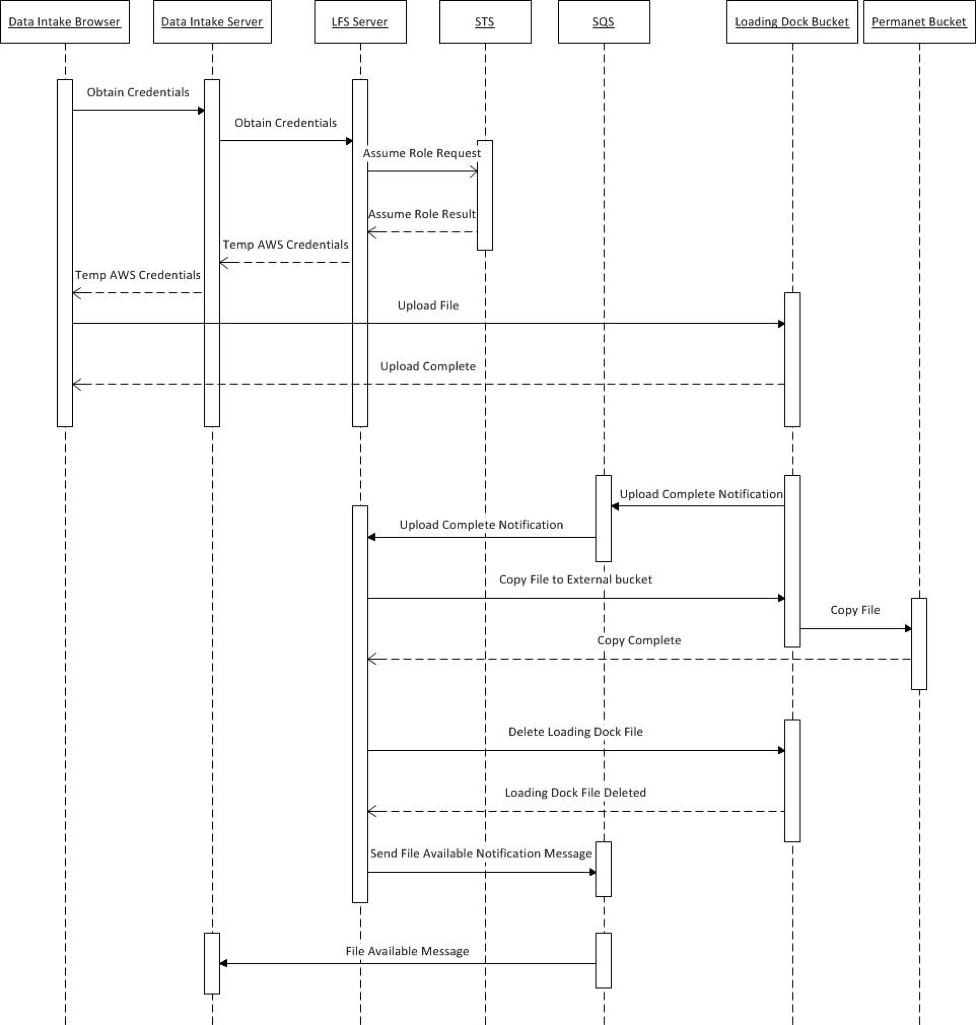
- A user requests to upload a file via the Data Intake browser-based application.
- The browser makes a REST call to its application server requesting temporary credentials to the S3 loading dock bucket.
- The Data Intake application makes a REST call to the LFS application requesting temporary credentials.
- The LFS application makes an STS “assume role” request to obtain the temporary credentials.
- Credentials are returned to the Data Intake application server.
- Credentials are returned back to the browser.
- The browser application uploads the file to the S3 loading dock bucket using the temporary credentials.
File Moved from Loading Dock Bucket to Permanent Bucket
- Once the file is uploaded, S3 publishes a notification to an SQS queue.
- LFS receives the notification that the upload is complete from the queue.
- LFS copies the file to a permanent bucket. While being copied, the file is re-encrypted with a different KMS key.
- The original loading dock file is deleted.
- LFS publishes a “file available” notification message to the SQS queue.
- The Data Intake application reads the message and marks the file as available.
The following diagram shows the sequence flow when a user uploads a file using LFS.
LFS Technical Details
Two Bucket Security Approach
LFS uses a two bucket architecture for security. The first bucket is a temporary loading dock that is externally exposed, allowing firms to write files. Security measures include:
- Users are given temporary credentials to write to specific locations.
- Read operations are not permitted.
- HTTPS connectivity is required to write files.
- Server Side Encryption (SSE) is required.
- A specific KMS id is used to encrypt files.
- The Cross-Origin Resource Sharing (CORS) configuration allows applications from finra.org to write to the bucket since the bucket is within amazon.com.
- Files are automatically deleted via a lifecycle policy after a specified time limit to remove any remaining transit files.
The second bucket is more secure and becomes the files’ final place. External users don’t have access to it. A separate internal KMS id is used to encrypt files. It also requires HTTPS connectivity and server side encryption.
While a two bucket solution strengthens security, it complicates the architecture. A less secure alternative would use a single bucket but require carefully configured policies, granting access to users and applications only as needed.
Creating an S3 Bucket
To create a S3 bucket follow these directions and these values:
Bucket Name: Enter the name for the bucket (e.g. “lfs-loading-dock” or “lfs-permanent”).
Region: Select from one of the regions (e.g. US Standard).
Once the bucket is created, you can create the security policy in 3 steps.
- Click on the “Properties” button after selecting the bucket.
- Under “Permissions” section, click “Edit bucket policy”.
- Enter the security policy in JSON format as well as SSL and SSE enforcement.
Find out more on bucket policies here.
Under the “Edit CORS Configuration” button you can configure the CORS header information (i.e. which HTTP methods are allowed for specific domains). For security reasons, web browsers do not allow requests to be made to other domains. However, a server on a different domain can return “CORS” headers informing the browser that it can make certain HTTP calls to it. Learn more about CORS here.
In the “Lifecycle” section you can configure policy to automatically delete files after a period of time from the loading dock. This way, the loading dock only contains parts and files in-flight.
Configure this by:
- Clicking “Add rule” and follow the wizard steps.
- Under “Whole Bucket”, check the “Permanently Delete” option to specify the number of days before the file will be deleted.
Then, the S3 service will automatically delete files after the specified time period has passed.
Note: Be sure this configuration is only applied on the loading dock bucket. You don’t want files automatically deleted from the permanent bucket.
Obtaining Credentials
When a client application wants to upload a file, it invokes an LFS API, specifying information about the file and optional metadata. The LFS determines a unique location in the loading dock bucket and returns temporary write credentials for that location. LFS creates temporary credentials for writing to the specific location with IAM/STS. This API may be called multiple times to extend credentials once they have expired.
KMS Key Creation
The KMS key can be created using the IAM portion of the console by selecting “Encryption Keys” from the left hand menu. The “Create Key” button will initiate a wizard that takes you through the process. Make sure permissions are granted to the EC2 instance that creates the temporary credentials. You can find out more here.
Limited Access S3 Loading Dock Writing Role
LFS uses a special limited access role that only puts objects (s3:PutObject) in the loading dock bucket as well as generate KMS data keys (kms:GenerateDataKey) and decrypt (kms:Decrypt) files using the KMS key. Create roles in the IAM portion of the console by selecting “Roles” from the left hand menu. When creating the role, enter a policy that performs these restrictions using the Amazon Resource Names (ARN) for the S3 bucket and KMS key. More information on creating IAM Roles can be found here.
STS Role Restriction
When the LFS API is invoked to return temporary credentials, it uses the AWS STS AWSSecurityTokenServiceClient.assumeRole method to create restricted credentials. This blog post demonstrates how the assumeRole API can be used.
Upload Files to S3
Using temporary credentials, the intake browser application uses AWS’s JavaScript Software Development Kit (SDK) to perform a multi-part upload to the S3 loading dock bucket over the secure HTTPS protocol. The browser breaks the source file into multiple chunks and uploads each chunk individually.
If the temporary credentials expire at any point during the upload, the LFS REST endpoint is invoked for new temporary credentials. This process can be repeated as long as necessary until all the parts have been uploaded. Then, the Data Intake application waits for an LFS notification that the file has been moved to the permanent bucket.
Amazon provides a basic JavaScript example of how a file can be uploaded to S3 using their SDK. The AWS SDK JavaScript documentation for the “S3” class provides more details on methods such as “createBucket” and “upload”.
Moving Files to a Permanent Bucket
Once the application uploads files to the loading dock bucket, the LFS service receives S3 SQS notifications, one per file. To receive these notifications, an SQS queue needs to be created. AWS directions on creating an SQS can be found here. When creating the queue, select a meaningful name such as “loading-dock-queue”.
To configure the notifications, follow these steps:
- Select the loading dock bucket from the S3 portion of the console.
- Select “Events”
- Click “Add Notification”.
- Select “ObjectCreated (All)”.
- For the Event, select “SQS Queue”.
- For where to send the event to, enter the previously created loading dock queue name for the SQS queue.
More details on creating a new event notification can be found within the “Enable Event Notifications” section of this page.
Once this notification is received, LFS copies the file to the permanent bucket. During this copy, the file is re-encrypted with a different KMS id. The copy occurs within the AWS infrastructure so no data leaves the cloud. The copy can be done using the TransferManager class of the AWS S3 Java SDK. TransferManager improves performance because it copies files in multiple parts with multiple threads. This blog post demonstrates how a file can be copied using TransferManager.
Once the copy completes, the original loading dock file is deleted using the AmazonS3Client.deleteObjects API. If the upload fails, leaving any loading dock in-flight parts, an LFS background job automatically deletes them. This is done using the listMultipartUploads and abortMultipartUpload methods of the SDK S3Client class. Just in case the original file couldn’t be deleted, the loading dock lifecycle policy previously configured also ensures any dangling files will be automatically deleted.
Other Topics to Consider
Although the LFS architecture is very robust, there are still other issues to consider:
- The Amazon JavaScript SDK running in-browser does a great job of uploading large files to S3. However, it doesn’t support older browsers. Here are some of the browsers that are supported. If uploads are required for unsupported browsers, you’ll need a custom built fallback strategy. In the case of Data Intake, the browser streams files to the Data Intake application server which proxies the uploads to S3. This flow is not as robust and is only recommended for files 500MB or less.
- Some Data Intake users could have firewall rules that don’t allow the browser to connect directly to the S3 bucket or strip authentication header information from the request. A possible solution would be connecting the browser to a reverse proxy server (e.g. F5, Nginx, etc.) that is configured within the same domain as the application server.